Ok, first, we start out with a new picture, with these settings below.

The next step, I prefer, is to do the diagonals. For this, you deselect anti-aliasing, make sure the width is one, and start making lines (make sure you zoom in to 3200% and that all lines are spaced). A good technique that I use, is to do part of it, then copy/paste that over a few times, then select that, copy/paste it another few times and there you go.
IMPORTANT: SAVE NOW. DO NOT SAVE AS WHAT YOU WANT YOUR USERBAR’S NAME TO BE. GOT IT? Good. Lets move on. I know that it took a lot of work to make that background, and you don’t want to do it over and over again. So, the next userbar you make, you already have those lines done.
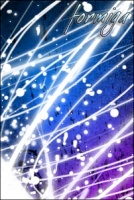
The next step, is to do your background color. For me, I’m doing blue. If you want to do a gradient, you would do the gradient, THEN do lines. So, to do this, fill in all of the spaces between the lines. Again, this will take a while. Pity. I would do it the same way I did the lines, with the copy and paste. It should look like this..

But do we want those lines to be so defined? Nooooooooo we don’t. So we simply apply another layer, and make it all the same background color as before (in my case, blue.) Once that is done, decrease opacity. For me, I dropped it to 137. So now, it should look like this.

Now, its time for your picture and text. Add another layer, and insert your picture on the left. [Yes, I know that A) these are not the best colors for Yoda. B) that I did some bad cropping in my selection of Yoda. So HUSH.] So now it looks like this.

Now for the text. You will need to download the Visitor TT2 font, of which you can go find on the userbar.com’s forums. Now, to add the font where you can use it, use microsoft’s search and search for .ttf, and where the file is with all the ttf files, that’s the font folder, and download the font to there. So its installed, but there is a problem. THE FONT DOES NOT SHOW UP IN PDN! Yes, this is a pissoff. But you can get around it. It DOES show up in ms word, so I simply type what I want in ms word, highlight it (this is so the font is white, not black) then screen shot (press the key above “insert”), paste in a separate pdn window, copy and paste onto your userbar layer. So, now your font is in pdn. Now you add a one-pixel boarder around your text with the pencil. Now it looks like this.

Its starting to actually look like a userbar. Now, we add that white thing that always goes across the top. To do this, add another layer. Then, use the circle selector, (ellipse), and select what you want to be that lightened thingymabob. Once your ready with it selected, fill it with white. Now, since it does not have anti-aliasing, add a radial blur on it. Now you can deselect, the drop the opacity.

Voila! There you go. Now, from here, you could stop and say that’s it, or you could add a slight gradient, dark to light. For this, just use one of the other ways for gradient on the paint.net forums, and drop the opacity, of course.